Setup FW Installer For Production Environment
This documentation is how to setup or update a production environment. For example, if the apps are hosted on a Network Drive, then each computer accessing that Network Drive will need to setup their fw environment. If you are using a Dreamhost server, the setup will be a little different because fw is setup on that virtual machine rather than on each individual machines. This documentation assumes that you are using a network drive (such as K: drive for library.olivet.edu) rather than a Dreamhost virtual machine (such as what is used for apps.bennerlibrary.com). There are two aspects to this documentation: what is needed to setup for the first time, and what is needed to update for each PHP update that is released.
First Setup for a New Computer
Get Drive Access
- Make sure you have access to whatever Network Drive you are using (such as the K: drive). In the case of the K Drive, your user will need access to both
K:\web\libraryweb\docs\info-appsand sub-directories as well asK:\web\libraryweb\fwand its sub-directories.
Download Cacert.pem
-
In order to get curl and openssl to work in php, you will need to download a cacert.pem file, which can be downloaded by clicking here, and save it to your
C:\Windowsfolder, so you can access it in a later step.- If you get an error later on such as
cURL error 60: SSL certificate problem: unable to get local issuer certificate, then you have not done this step properly.
- If you get an error later on such as
Install and Configure PHP and Composer
-
Download and Install PHP.
- If you are on a computer using WAMP or XAMPP, you can skip this step and php folder (for Xampp it is usually
C:xampp/php, and for Wamp it is usuallyC:\wamp64\bin\php\{php version}) - Most of the time, you will not have php already downloaded. In this case, you need to download it from the php website. For now you need to download the Thread Safe Zip File of the most recent version of PHP 8.2.x from this link. Alternatively, if this version is no longer available for download check
U:\Informatics\Programming\Setupfor K Drive for a zip file. - Finally, you need to extract the main folder to the folder:
C:\Users\{username}\php.
- If you are on a computer using WAMP or XAMPP, you can skip this step and php folder (for Xampp it is usually
-
Edit the
php/php.inifile. If there is nophp.iniin this folder, rename thephp.ini-productionfile tophp.iniand modify that file with the following changes:- Search for
extensionand uncomment the following extensions (by removing the leading semi-colon):extension=curlextension=opensslextension=intlextension=zipextension=pdo_mysql
- Search for
phar.readonlyand uncomment the line and turn it off. (so change the line;phar.readonly=Ontophar.readonly=Off) - Lastly, modify the
curl.cainfoandopenssl.cafileto be the cacert file you downloaded in step 2 (should be located atC:\Windows\cacert.pem)- So then, the lines should now look like
curl.cainfo="C:\Windows\cacert.pem"andopenssl.cafile="C:\Windows\cacert.pem"
- So then, the lines should now look like
- Search for
-
Download Composer 2.5.4 for Windows by clicking here (just accept all defaults). You will need to scroll down to find the 2.5.4 version to download.
- Double check that you downloaded the correct version of Composer. Open Command Prompt and type
composer --version, and ensure that you are on Composer 2.5.4. If you are not, run the commandcomposer self-update 2.5.4, and it will install the correct version.
- Double check that you downloaded the correct version of Composer. Open Command Prompt and type
Setup Environment Variables
-
Make a folder
C:\Users\{username}\webroot\binto put your fw installer into. -
Modify your PATH environment variable to enable using
fwandphpfrom the Command Line.- Type Windows + R, and type
control sysdm.cplin the text box. - When the window pops up click Advanced, then click the Environment Variables Button
- In the top part click Path variable (under User variables), and Click edit. Add the following two paths: the PHP path (most likely
C:\Users\{username}\php, unless you had WAMP or XAMPP), and the bin folder path (C:\Users\{username}\webroot\bin)
- Type Windows + R, and type
Install FW Installer
-
Install FW Installer:
- Download FW Installer from here, and save it in
C:\Users\{username}\webroot\bin. It should be anfw.pharfile. - Restart or open Command line, and create a cmd file to run the fw installer, by running the command
echo php "C:/Users/{username}/webroot/bin/fw.phar" %* > fw.cmdin your bin folder, like this:console C:\Users\{username}\webroot\bin> echo php "C:/Users/{username}/webroot/bin/fw.phar" %* > fw.cmd
- Download FW Installer from here, and save it in
-
Bitbucket is no longer allowing users to use their Atlassian passwords for Git authentication, which means you need to create an app password for this. If you have already created an App Password, just navigate to where you have it saved, otherwise create a new one. Create an App Password by Clicking your picture in Bitbucket, clicking Personal Settings, then click App Passwords. When you Add a Password, use the following settings:
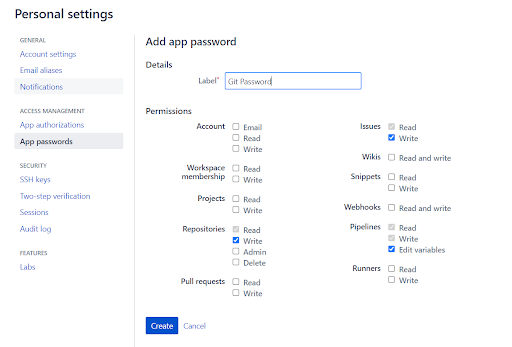
Note: Make sure to copy the password before you close the box because you won't see the password again. If you need it again, just make another Git Password the same way.If you have already created an App Password for Bitbucket, then just navigate to where you have that saved, and use that for the password field. If you have not, create an App Password with
- Login to Bitbucket on fw by using the following command with your Bitbucket Username, and your App Password:
C:\Users\{username}\webroot\bin> fw login bitbucket
Updating PHP version and FW Environment
While each PHP update may be a little bit different, and the lead developer will need to tell you if there is anything special that you need to do of these steps, generally, it will be the following steps:
1. Update fw-installer by running command fw self-update.
2. Download the new PHP version and configure php.ini as listed in step #4 above.
3. Update your FW API by running command fw setup --update
4. You MAY need to update Composer (check with lead developer) by running composer self-update or composer self-update {specify.version.number}.
5. Update all the apps, but you must begin by updating gc first (using fw update gc)