FW System Installation for Windows
This tutorial will guide you through setting up FW on a new Windows system. If you are asked at any time during installation to create a user profile in gc (group control), make the username "admin" and the password "password". Note: the Command Prompt must always be launched in Administrator Mode.
Initial Setup for Personal Devices
If you are planning to develop on a shared computer on which another user has already set up their own FW Development Workspace, then you can skip these steps and move to Setup for All Devices. If you are the first user to set up on this computer, follow these steps as well.
- Run Command Prompt as administrator by searching for it in the start menu -> right click -> "Run as Administrator"
- (Check if curl is installed by opening Command Prompt and running
curl --version. If the command "is not recognized", you must follow steps 2-5. Otherwise, you may skip them.) Install curl from its download page. Make sure to select the default Windows 64-bit option (not the cygwin version), as in the picture below.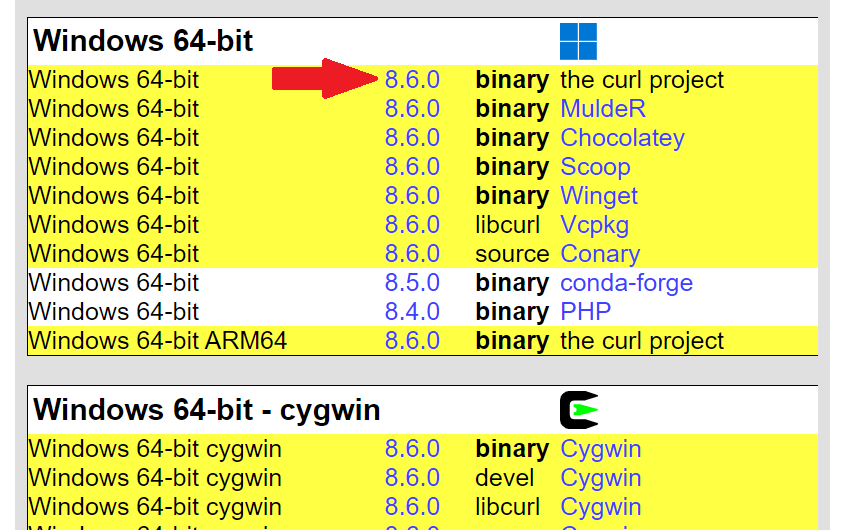
- In the "Downloads" folder, right click on your "curl" zip folder and select "Extract All…". Then click "Extract".
- In the extracted folder, open the bin/ folder and copy curl.exe (note if using an older version of curl, you may need to use the src/ folder).
- Paste
curl.exeintoC:/Windows/. - Download a file needed for curl
C:\Windows> curl -O https://curl.haxx.se/ca/cacert.pem
- (Check if git is installed by opening "Command Prompt" and running
git --version. If the command "is not recognized", you must follow step 7. Otherwise, you may skip it.) Download git for windows and install the program. Accept all the default installation options. - (Check if node is installed by opening "Command Prompt" and running
node --version. If the command "is not recognized", you must follow step 8. Otherwise, you may skip it.) For compatibility purposes, we no longer use the most recent node version, but use version 20 because we are currently using gulp 4, which doesn’t work with the newest node. For most consistent compatibility use the latest node 20 version. You can download the proper Node 20 version with an installer with this link. Accept all the default installation options. After you have finished installing, restart your command line. If there are issues with node you can go directly to the website https://nodejs.org/en/download.
8.5. If you want to switch between different node versions for other projects or potential app updates. Please refer to https://apps.bennerlibrary.com/kb/#/entry/1307 to use nvm which allows easily switching between node versions. This is not needed for installation and can be done at a later point.
Setup for All Devices
Install NPM, Yarn, Gulp and Configure Git
- Install yarn and gulp globally
C:\> npm i -g yarn gulp
- Configure your git profile (Use Bitbucket login information)
    C:\> git config --global user.name "[firstname] [lastname]"
    C:\> git config --global user.email "[email]"
    C:\> git config --global credential.helper 'store'
Download XAMPP and Configure PHP
-
Download XAMPP by clicking here. VERY IMPORTANT: Select the XAMPP version which goes with PHP 8.2, as this is the current PHP version our FW System uses
-
You need to make changes to your
C:\xampp\php\php.inifile in order to make PHP work with the apps. Using the text editor of your choice make the following changes tophp.ini- Set the line
phar.readonly = Ontophar.readonly = Off. Make sure the line is uncommented (remove the semi-colon at the beginning of the line) - Search for
intland uncomment the lineextension=intl - Search for
zipand uncomment the lineextension=zip - Save your changes and close.
- Set the line
Configure Environment Variables
-
Make sure to note the directory where your
php.exefile is located, and save it for later (it will most likely beC:\xampp\php). -
Make a
webrootfolder in theC:\Users\[yourUsername]directory, then make two sub-folders:fw-dev(where nearly all work in the FW App system occurs) andbin(where our commands will be stored). This can be done by the following commands in command line:
C:\Users\[yourUserName]> mkdir webroot
C:\Users\[yourUserName]> cd webroot
C:\Users\[yourUserName]\webroot> mkdir fw-dev bin
-
Edit your Environment Variables to include three paths.
- Press "Windows key + r" to open the run menu and run "control sysdm.cpl"
- The "System Properties" menu should pop up. Under the "Advanced" tab, click the "Environment Variables…" button
- Select the "Path" user variable and click the "Edit…" button
- Add the following three paths to the Windows PATH variable (if they are not already added):
- The newly created bin folder (ie
C:\Users\[yourUserName]\webroot\bin) - The folder form step 14 (ie
C:\xampp\php) - NPM Roaming Folder. (it will probably be:
C:\Users\[yourUserName]\AppData\Roaming\npm). - "Then click "OK" to any windows that are open.
- The newly created bin folder (ie
- Note: You are only able to use these steps if you have admin access for your computer. If you are attempting to use override access with another user account it will not work. In this case, you will need to search "Edit Environment variables for your account" (rather than for the whole system) and edit the environment variables there.
Download and Setup FW Installer
-
Download the FW installer from here and save it in
C:\Users\[yourUserName]\webroot\bin. Note: if you are intending to develop the FW Installer, and not just use it in production mode, please see this alternative setup for step 17. -
Create a CMD file to run the installer:
C:\Users\[youronuname]\webroot\bin> echo php "C:/Users/[youronuname]/webroot/bin/fw.phar" %* > fw.cmd
- Install Composer. Go to the Composer download page, scroll down to version 2.5.4 and download it.
- Note: It is possible in the future that you can download the latest version. For now, the latest version can cause issues with our setup so it's best to use 2.5.4 which we know for certain works.
- You will need to make the file executable, move it somewhere in your path, and ensure that it is just called
composer. An example of this would look like:chmod +x ~/Downloads/composer.phar && sudo mv ~/Downloads/composer.phar /usr/local/bin/composer.
Make Bitbucket Account
-
Make a bitbucket account here, and give Informatics Admin your username and/or email so that they can give you access to the Library Informatics Workspace.
-
You will need to create a Bitbucket API Token so that the FW Installer can access your account.
- Click on (1) the gear in the top right corner of Bitbucket and select (2) "Atlassian account settings." At the top of the screen go to "Security," then click "Create and manage API tokens."

- Go to "Security" at the top and click "Create and manage API tokens."

- A code will be sent to your email. Once you enter it, you should see the "Create API token with scopes" button. Click it and enter a name (for example, "FW API Token"). Set the expiration date to 1 year in the future (which is the max allowed). Click "Next."
- Select "Bitbucket" when prompted to select an app. Click "Next."
- Make sure the following scopes are checked:
- admin:repository:bitbucket
- admin:workspace:bitbucket
- read:project:bitbucket
- read:repository:bitbucket
- read:workspace:bitbucket
- write:repository:bitbucket
- Click "Next," verify everything looks right, then "Create token."
- Click on (1) the gear in the top right corner of Bitbucket and select (2) "Atlassian account settings." At the top of the screen go to "Security," then click "Create and manage API tokens."
Note: Make sure to copy the token and save it somewhere before you close the box because you won't see it again. If you lose it (or it has expired), just make another token the same way (you can revoke any unused tokens).
- Restart Command line in Administrator Mode, and navigate to the fw-dev folder and Login into bitbucket on FW, using the Bitbucket account you just created. For more information on this command, click here
C:\Users\[yourUserName]\webroot\fw-dev> fw login bitbucket
Finish Setting up your FW Workspace
- Run the setup command to set up the FW app system. For more information on this command, click here
C:\Users\[yourUserName]\webroot\fw-dev> fw setup
- Install Group Control, so that you can add permissions. For more information on install command click here.
C:\Users\[yourUserName]\webroot\fw-dev> fw install gc
Note: If you get Task 'Download' Failed, it means your bitbucket credentials did not work. Ensure you used your correct username and app password.
- You will now be prompted to enter setup information. for the Web Root and App Url fields, simply hit the "enter" key to use the default values. Do the same for the the "Do you want to set up config values…" field. After hitting enter, you will need to find the Passwords entry with the credentials for your personal database. It should be called
bennerlib_[yourOlivetUsername], if you don't have this take to an Informatics Administrator for them to make you a database. Enter the correct database credentials from the Passwords entry as prompted.
Note: If you get a Database migration failed, you did not correctly enter your database credentials, first ensure you typed your database credentials right by checking the file directly, found at webroot/fw-dev/config/local.php, or you can do it in the command line by running fw install --config in the gc folder (so C:\Users\[yourUserName]\webroot\fw-dev\apps\gc) and filling out all the properties as prompted. If it does not work the second time, check with an admin to make sure your database is setup correctly in Dreamhost, as described in this Knowledgebase Entry.
Configure Apache
- Configure your Virtual Hosts. Using your preferred text editor, edit
C:\xampp\apache\conf\extra\httpd-vhosts.confby adding the following text:
<VirtualHost *:80>
        ServerName [yourUserName].localhost.com
        DocumentRoot C:/Users/[yourUserName]/webroot/fw-dev/public
        <Directory C:/Users/[yourUserName]/webroot/fw-dev/public>
                Options Indexes FollowSymLinks
                AllowOverride None
                Require all granted
        </Directory>
</VirtualHost>
Note: If a virtualhosts block called [yourUserName].localhost.com already exists, change ServerName to fw-[yourUserName].localhost.com. On a personal computer, if you wanted, you could name it fw.localhost.com, which is easier to type. Also Note: xampp comes with a couple vhosts already defined. Feel free to erase the contents and put your own virtual host. Just don’t mess up another user’s vhost (if on a shared computer).
- Edit the file
C:\Windows\System32\drivers\etc\hostsin Administrator Mode in your preferred text editor by adding the following line ([ServerName]is the ServerName in yourhttpd-vhosts.conffile in the previous step):
127.0.0.1 [ServerName]
-
Start or Restart Xampp by opening the Xampp control panel and clicking 'start" next to Apache. Then navigate to
ServerName(by default[yourUserName].localhost.com) in your preferred web browser, and it should show you a page with a gc folder. -
Click on GC and login with username "admin" ad password "password". If you do not receive a login error, then you have done everything correctly.
Installing Other Apps
You have successfully completed the FW Installation process. Make sure to follow our other guides to install apps for development or for production.