Server Side
The purpose of this is to give a brief introduction to the key aspects more fully described in the Server section of the Main Documentation, which can be found beginning here.
Overview
FW apps implement what is called REST; put simply, this means the client and server side of the apps are logically separate. In a non-REST based app, you will typically see calls to the database made in the same code that render the page. A REST based app separates those concerns by having a server side that handles data processing and permissions, and a client side that creates an HTML interface for the end user to use. In FW apps specifically, data is passed between the client and server in the form of JSON text.
The server side of FW apps is accessed through subpages of the API file located at {baseURL}/{appID}/api/v1.0.php. As an example, on the live website for the app Status, this API would be called from apps.bennerlibrary.com/sta/api/v1.0.php. Note from here on for simplicity the URL will just be described from /v1.0.php onwards.
API requests are typically made internally in Ember models, though specialized requests can also be made manually using the AJAX service. To view all requests made by an app to the server, open developer tools (F12 in Chrome), click “Network”, then click the “XHR” filter. (You may need to reload the page after opening developer tools for the list of requests to populate). You can click on a request to get more information, such as the request response or data sent with the request.
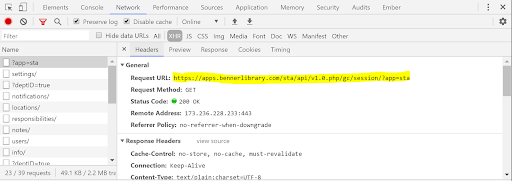
In the picture above, you can see a sample request. Note the request URL highlighted in yellow.
Payloads
Since FW implements REST, the data for most requests is in a standard format. Data sent both from and to the server side contain a single key with the model name, followed by a JSON object with the model data:
{
  "example": {
    "id": 1,
    "key1": "some value",
    "key2": "value"
  }
}
If multiple models are contained in the request, the model name becomes plural and contains an array of model objects:
{
  "examples": [
    {
      "id": 1,
      "key1": "some value",
      "key2": "value"
    },
    {
      "id": 2,
      "key1": "text",
      "key2": "more text"
    }
  ]
}
Some custom methods will use non-standard JSON based on the app, but in general, this is the format expected by both Ember and the FW server.
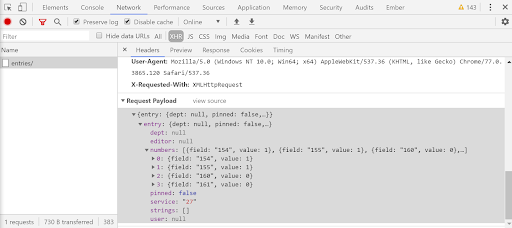
You can view these JSON payloads in developer tools. From a network request in developer tools, you can view the payload sent from the client to the server in the headers tab. Note it will be made into an interactive treeview, but the data is JSON:
To view the payload sent from the server to the client in the same interactive form, you can use the preview tab:
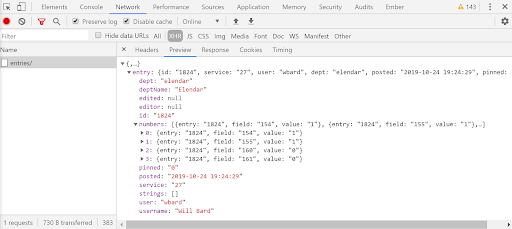
Or you can use the response tab to view the raw JSON data:

Router
When a server request is sent to /v1.0.php, the request is first processed by the app’s Router.php, located in {appID}/server/src. This file contains the mapRoutes() function, which tells FW how to direct the request to a controller based on the URL after v1.0.php
Simple route group
For most app controller, there will be a call like $this->generateRouteGroup('examples') which will direct all web requests from /v1.0.php/examples/ to the Examples.php controller using the default BREAD methods. In general, every controller corresponds to a model on both the client side and server side.
HTTP verbs
Before discussing the default BREAD methods, it is necessary to understand the different HTTP/HTTPS methods. As stated earlier, each request has a specific URL; however they also have a request method, often called a request verb to prevent confusion with other types of methods in computer science. This request verb allows multiple requests to be made to the same URL with different behavior.
While there are other request verbs, the ones used by FW are the following:
- GET: Get requests are the most common web request. It is simply a request to the server to return data. GET requests will return data from the server, but should not modify any data on the server.
- POST: A post request’s job is to add new data to the server. POST requests in addition to the request URL and method also include a JSON request payload for data to add to the server.
- PUT: A put request is similar to a POST request, except its job is to modify existing data on the server. PUT requests typically include a request payload similar to POST requests, but it is not always the case.
- DELETE: Delete requests remove data from the server. Typically, these requests do not return a response as the data no longer exists.
For more information on request verbs, you can refer to the following external guides, though reading them is not required to continue in this tutorial:
BREAD
As mentioned in “simple route group”, by default most controllers implement the default BREAD methods. These methods are used to modify models in the database.
These methods are defined as follows:
- Browse: A GET request which fetches all models from the given controller.
- The URL to browse the examples controller would be
/v1.0.php/examples/Read: A GET request which fetches a specific model by ID from the given controller. - The URL to “read” model ID 7 from the “examples” controller would be
/v1.0.php/examples/7/
- The URL to browse the examples controller would be
- Edit: A PUT request to modify a specific model on its ID. Like most PUT requests, edit includes a JSON payload describing the changes to make.
- The URL to edit model ID 7 from the “examples” controller would be
/v1.0.php/examples/7/ - Note the URL for “edit” is the same as the one used for “read”; the difference is “read” is performing a GET request, while “edit” is performing a PUT request.
- The URL to edit model ID 7 from the “examples” controller would be
- Add: A POST request to add a new model based on the JSON payload
- The URL to add a new model in the “examples” controller would be
/v1.0.php/examples/ - Note that URL is the same as “browse”, similar to the URLs for “read” and “edit”. The difference is again the method used, “browse” is a GET request while “add” is a POST request.
- The URL to add a new model in the “examples” controller would be
- Delete: A DELETE request to remove a model based on its ID.
- The URL to delete model ID 7 from the “examples” controller would be
/v1.0.php/examples/7/ - Again, like with “edit”, this is the same URL as “read”. In the case of “delete” the DELETE verb makes it unique.
- The URL to delete model ID 7 from the “examples” controller would be
The logic for each of these five methods are implemented in the controller, which will be discussed a bit later.
Custom routes
Before getting into controllers, one last thing to mention is some route groups implement additional methods besides BREAD. These route groups are defined after the route name in generateRouteGroup in arrays in the following form:
[url, function, verb]
Each of these arrays defines a custom route based on the three values:
url: This is the URL after the controller name to reach this route.function: The name of the function called in the controller by this route.verb: the HTTP method used for calling this route. (GET, POST, etc)
More details about this will be provided in an upcoming tutorial, but this should be enough for now to understand how to read a custom route.
Controllers
The role of the controller is to implement PHP logic to find, create, edit, and delete data. Controllers are also responsible for permissions checks and using other services, such as emails. The controller’s job is to take the URL and request data from the client side, and redirect it to various services.
Typically, controllers interact with the database using the server side version of models. For instance, the “browse” method is expected to return all models of a specific type; this is accomplished by calling the findAll method on a model. Likewise, the “edit” method typically validates data, then passes the data along to the model’s edit method. Models will be discussed more in depth later in this tutorial.
Most of the main BREAD methods typically just let the user directly interact with the data stored on the server, meaning the user can freely modify all keys in an edit request or fetch all data for browse. This is not always the case; some methods will take minimal input from the user to perform a specific edit, restrict editing specific data, or even modify other data as a side effect of the user’s changes. This logic is implemented within the controller, which makes the logic pretty easy to trace.
Method headers
As mentioned in the BREAD discussion and in “custom routes”, the router maps routes to a function within the controller. GET and DELETE requests (used for browse, read, and delete) have the following function header:
public function functionName($options)
Meanwhile, for POST and PUT requests (used for add and edit), one more parameter is added:
public function functionName($object, $options)
The functionName is defined in the route. Basic routes such as browse, read, and delete are named “browse”, “read”, and “delete” respectively, though custom routes can use any name for the function.
Options
The $options parameter is a PHP object containing both query parameters and any dynamic route segments. Query parameters need to be defined in the $allowedOptions array at the top of the controller to show up in $options. Dynamic route segments are covered more in depth in the custom routes tutorial, but the main one you need to understand is the ID for “edit” and “delete” requests shows up as $options->id.
Payload object
The $object parameter is a PHP associative array containing the JSON payload from the request. As mentioned above, this only exists for POST and PUT requests. This payload is a PHP associative array containing data in the format described in the payload section above.
Server side models
Models on the server side provide a way to read database tables into PHP objects and to write PHP objects to the database. Additionally, models provide a way to translate from database names to the more readable client side keys.
Working with models
Controllers can directly access models using the adapter. The adapter’s job is to add the necessary database connections to the model before making database calls. The general syntax for an adapter call is as follows:
$this->adapter->methodName('Example', $arg1, …);
This will call the methodName function from the Example model using all parameters after the model name. It would be equivalent to the following function call within the model:
methodName($arg1, …);
For a specific example, let's say you want to call the findAll method on the Example model as follows:
findAll(['dept' = 'info'], ['include']);
To call this function, you would run the following adapter code:
$this->adapter->findAll('Example', ['dept' = 'info'], ['include']);
For a full list of available model functions, see the following API documentation
Common model keys
The first thing contained in each model is every database column name as a protected non-static field. These fields are used to determine which keys to fetch when doing database requests, and are used to reference model data on the server side.
Models also contain the following static protected properties to configure the model:
$table:- Table from which the model fetches data
$id:- This is the name of the table column representing the primary key
$aliases:- An associative array with keys as the client side names and values as the server side names.
- This is used to convert data fetched from the database into clean JSON and to convert the JSON keys into database names for edits.
- In general, all code should reference model values using the alias keys as they are more concise. This allows the column name to be easily changed.
$required:- This array contains all keys that must be set to make a model in the database.
- This generally includes any database key that is not nullable and does not have a default value.
- Note the ID key should not be required if the table uses an auto incrementing ID, which is the case for most models.
$searchable:- This is a list of any keys that are searchable using exact comparisons
- This should generally include ID keys, foreign keys, and boolean values.
- This generally excludes description fields
- Dates are currently excluded as FW does not support range searches.
$allowedJoins:- This array contains a list of keys for joins with other tables, notably many to many and one to many relationships.
- Each join corresponds to a function by the same name. Note that if the desired name for a join conflicts with an existing function, you can utilize aliases to work around that.
- Typically, joins provide a list of model IDs.
- This topic will not be covered in depth in this guide.
In addition, all FW models need the following two fields to be defined. Due to the way PHP handles static inheritance, if these are unspecified it will lead to bugs when using multiple models together.
    // these fields need to exist to avoid sharing the variable with other models
    public static $fields;
    protected static $filters = [];
By default, all models extend FW\Data\Standard\Model which gives access to all the functions mentioned in the previous section. In addition to those, additional custom functions can be defined by making them public static, allowing them to be called by the adapter like the built in functions.
For a full list of available model properties used in configuring models, see the following API documentation